Red Special
How I constructed my own Red Special - a report by Mark Reynolds
I started the project in July 1996 and it was completed in February 1997. The total cost of making the guitar was £350.
Tremolo system
The tremolo block was made from a piece of mild steel plate. It was shaped using saws, files and drills. The slot for the knife-edge was done by using a square and a scribe. I made a few deep scores with the scribe and then finished the groove with a triangular needle file. The tremolo arm was made from 5mm stainless steel rod which was silver soldered into a brass swivel. The brass swivel was turned on a lathe. The arm was fixed to the tremolo block using a bolt, washers, nut and dome nut.
The knife-edge was made from 3mm thick steel plate. I had the point machined on to the plate. I then drilled the six holes that fix it to the oak and countersunk them. The plate was then case hardened.
The bolt retainer was made from 3mm steel plate. There were three holes drilled into it to allow it to be fixed to the oak. There were then two clearance holes drilled for the bolts. On the back of the plate, in line with the boltholes, I welded two nuts for the bolts to screw into.
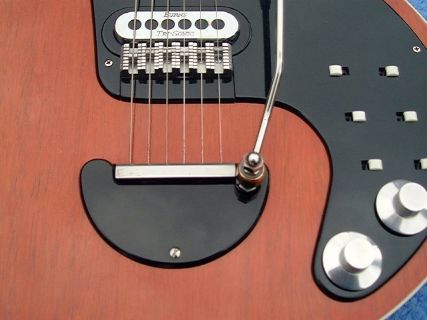
The bridge
The bridge was made out of six individual blocks of aluminium. The end pieces were slightly wider than the centre four pieces.
The blocks were cut from lengths of aluminium that had a 5mm channel
milled along its length.
Once the blocks were cut, I cut slots along them at intervals, for
the intonation settings. I cut the slots with a junior hacksaw. Each block
had a hole drilled in the centre for fixing to the body.
The rollers were made from 5mm steel rod. I cut them to size using a
lathe after putting a "U" shaped groove in them for the string to sit in.
Each roller had a 1/16th hole drilled through them for a 1/16th piece of
steel rod to act as an axle. The rollers freewheel on the axles.
Body construction
The body was made up out of two 18mm layers of Blockboard.
I screwed the two layers of blockboard together and then traced the
body shape on to the front of it.
Using a Jigsaw, I cut out the body shape just outside of the tracing
lines. I then used a Bobbin sander to remove the excess wood from the outside
of the blockboard body until I reached the tracing lines.
Using the Bobbin sander helps to keep the edge of the guitar square
and also to get a good smooth finish on the side of the guitar body. I
drew a centre line through the body of the guitar to ensure that everything
would be in line.
I then had to cut the pieces of oak that were to be fitted into the
centre part of the guitar body.
The centre section was made using two 18mm layers of oak.
The two oak pieces were cut to size using a cross saw. The top layer
of oak runs from the point where the neck joins the body up to the knife-edge
of the tremolo. The bottom piece of oak runs from the point where the neck
joins the body to the back of the cover for the tremolo cavity.
I then cut out the neck pocket in the top layer of oak. This then allowed
me to glue the two pieces of oak together using PVA wood glue. The two
pieces were clamped together and left to dry. Afterwards I drew a centre
line through the front face to ensure everything would line up.
Once I had done this I cut out the recess for the knife-edge using a
router. I made a template for the recess out of a piece of MDF. This way
you can ensure a good tight and level fit. The knife-edge was then screwed
to the oak.
I recessed the bolt retainer into the face of the two pieces of oak
below the knife-edge using a chisel. I drilled holes through the oak so
that the bolts could be screwed in to adjust the springs at a later date.
Once the fit was tight it was screwed into place. The tremolo was then
assembled to make sure it was all working before the oak was glued into
the blockboard. The bottom layer of oak had to have some wood removed to
accommodate the depth of the tremolo block. This was done using the router.
I made crucial measurements from my plans before fitting all these parts
to make sure that everything would line up.
The two halves of blockboard were then marked out to receive their
respective pieces of oak. I made templates out of MDF to cut out the oak
recesses with the router. I then made further templates for the top cavity
and the bottom cavity.
The top cavity was routed out of the inside of the two faces of the
blockboard. I left 6mm of wood in the front and back faces. Once the two
halves were glued together the cavity would then be a sealed hollow area.
The lower cavity was routed straight through the top layer of blockboard
and in the bottom layer was routed leaving 6mm of wood in the bottom.
Once all the cavities were routed, the two halves of blockboard were
glued together using PVA wood glue and then clamped around the body to
make sure all the faces were glued together.
Once the body was dry, the oak centrepiece was glued into place using
PVA wood glue. It was clamped together to make sure all the pieces stayed
in place.
The front and back faces of the body were then veneered with Brazilian
Mahogany veneer. The body was smeared with PVA wood glue and the veneer
sheet was pressed into place. I then put a flat board over the veneered
body and then added weight to it to keep the veneer flat. I left it overnight
and then repeated the process for the back.
Once the front and back were veneered, I cut the excess off with a craft
knife.
I then veneered the side of the guitar. I cut the veneer into 8-inch
strips. The veneer was glued on with Evo-Stick contact adhesive. This is
because the veneer does not want to stay on the curves of the body. Contact
adhesive is instant and is a quick way of keeping the veneer on the edge.
I then routed a channel around the body edges, front and back, for the
white binding. The depth of the channel was to suit the binding. The binding
was glued on slowly using Super Glue. I scraped off the excess white binding
with a craft knife blade.
The neck construction
The neck was made from one piece of Brazilian Mahogany. I had the block of mahogany planed so that it was perfectly square. I then marked out the neck shape on to the front face of the block. I used a band saw to cut out the shape of the neck. I cut the headstock angle with the same saw and finished the headstock face with sandpaper and block. I finished off the shape with sanding blocks and sanding paper.
To profile the back of the neck I used sanding blocks and sandpaper
and a sharp knife for scraping. I checked the back of the neck, at intervals,
with a straight edge so as to make sure that the back was level. I slowly
profiled a "U" shaped neck.
I made sure that the neck heel fit into the neck pocket of the body.
I then drilled a hole through the neck heel and into the body for the bolt
that holds the neck to the guitar. The bolthole at the back of the guitar
was recessed to allow the nut to sit in the body and only protrude by about
3mm. The bolt was fitted into the neck and glued into place with Araldite.
I routed the truss rod channel from just in front of the bolt to just
past where the fingerboard ended.
I then had the oak fingerboard planed to the correct thickness. Once
the fingerboard was flat, square, and the correct size, I placed the truss
rod in the routed channel and glued the fingerboard to the neck with PVA
wood glue. The neck was clamped face down onto the fingerboard on a flat
surface.
Once dry, I marked the zero fret onto the fretboard. I used a square,
scalpel blade and a magnifying glass.
I measured each fret spacing three times before cutting the fingerboard
with the scalpel blade. Once I had marked out all the fret positions I
had to radius the fingerboard.
I bought a radiusing tool from a luthier supplies. The sandpaper is stuck to the curved face of the tool and it is run back and forwards along the fingerboard until it takes shape. I checked the fingerboard with a straight edge to make sure I was not taking off too much wood one end.
Once the fret marks started to disappear, I re-cut them with the blade
until the radiusing was complete.
I then marked out my fret marker points. Using a proper wood drill,
I hand drilled the holes for the mother of pearl dots. I left the holes
deep enough for the dots to be slightly proud of the board. I glued in
the dots and scraped them back to the board with a craft knife blade. I
then cut the fret slots with a fret saw using the scalpel blade cuts as
my guide.
The edges of the fingerboard were then sanded back to the mahogany
neck and blended into the tapered length of the neck.
The fret wire was then cut into lengths just slightly longer than the
width of the board.
I hammered each fret into its slot with a hide hammer. Once all the
frets were in position, I carefully ran a file down the ends of the frets
to smooth them back to the fingerboard.
I marked out the holes, for the tuners, on the headstock. The holes
were then drilled.
The fingerboard needed to be painted black.
I masked off the mahogany, leaving only the fingerboard exposed. I
then drilled holes along the side of the neck for the small side dots to
be fitted. Using a tin of black car spray paint, I sprayed the whole of
the fingerboard. After the paint had dried I had to scrape the paint off
the frets and the fret dots! I then inserted the white plastic rod into
the holes on the side of the neck. I cut off the excess with the scalpel
blade.
I used as water based mahogany stain and stained the mahogany neck with
a cloth soaked in the stain. I also stained the body at the same time.
I left the stain to dry for a few days.
Lacquering the body and neck
I made sure that the stain was removed from the plastic binding by scraping
it off.
I removed all traces of dust from the body and the neck. The body and
neck were both sprayed using a two-pack acrylic lacquer. I gave it a few
coats, with even hand movements, and allowed it to dry for a while. I then
flatted the finish back with fine wet and dry to remove any high spots.
I repeated the process a few times in order to achieve a good finish.
Once lacquered, I allowed the finish to fully harden for about two weeks.
I had to scrape the lacquer from the fret surfaces with a small craft blade.
I used 1500 and 2000 grade wet and dry paper to flat back the finish.
Dipping the paper into water and using soap to help with getting a very
smooth finish on both the neck and the body.
The final polishing was done with a soft cloth and Brasso. Finally finishing
with Silvo.
Assembly
The guitar was now ready to be assembled. The neck was fitted into the body and the nut with a washer was fitted to the back of the body. I also screwed two wood screws through the neck and into the body to keep the neck in line. They are beneath the middle pick-up. This secured the neck. I found that the neck needed to have a neck angle. I shimmed the neck using veneer. The neck tilt was about 2 degrees.
The guitar has a zero fret so I had to fit a string guide (nut). This
was made from Perspex and was glued to the end of the fretboard with superglue.
All the other parts were fitted and the tremolo was assembled.
Strings were fitted and all the usual adjustments were made. The guitar
then had to be worked in. After a few days it began to settle. It now works
fine.
Perspex plates
The scratchplate, tremolo plate and truss rod covers were made from
3mm black Perspex. They were shaped using a junior hacksaw, wet and dry
paper and files.
The plates were then drilled for the pick-ups, switches, volume and
tone pots and fixing screws. The edges were then smoothed off with 1500
grade wet and dry paper and polished to a shine with Brasso.
The pick-up surrounds were made from 2mm black plastic.

Aluminium control plate
All the electrics are mounted on an aluminium plate fitted just below
the surface of the guitar body beneath the scratch plate.
I lined the control cavity with aluminium tape to cut down interference.
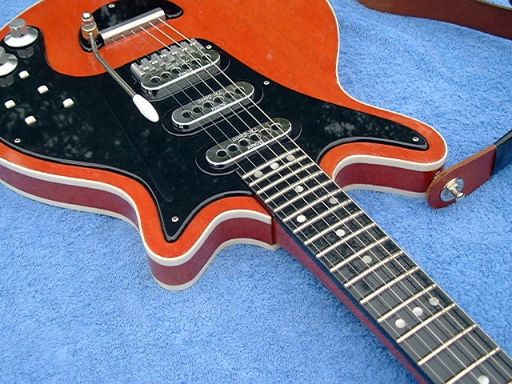
Pick-ups
I used Kent Armstrong Burns Tri-Sonics.
The pick-ups were screwed direct to the body. They had to be slightly
recessed in the body because of their height.
Volume and tone knobs
These were turned up on a lathe. They were made out of aluminium. The
head of the knob was straight knurled to replicate the originals. They
had a 3mm Allen screw fitted to lock them on the pot shaft.
Hardware
I used Schaller mini tuners and fitted pearloid tuner tips. This made
the headstock look close to the original Red Special.
Schaller strap locks were fitted to the guitar. The jack socket was
a barrel jack type.